http://www.sweetlivingmagazine.co.nz/
A link to the article is here: http://www.sweetlivingmagazine.co.nz/diy-birthday-card/
In the newsletter issue I submitted an idea for a simple, yet pretty birthday card. I included the directions as well. Please stop by the magazine to take a peek at what I did.
I wanted to share more about creating a card and so I asked Jane if I could create additional projects for her readers. I think you can be as simple or as elaborate as you want to be with stamping. Once you have some stamps and ink you can do as much or as little as you like. So I also created a matching envelope to put the card in.
Who wouldn't like to see this in their mail box? I bet it would be the first thing they would open.
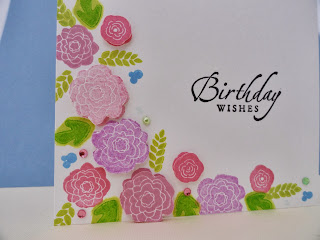
I wanted to show you one more idea on using this same stamp set. This technique is still quite simple, but requires a little more thought. I decided to use the same stamps, but a long thin greeting this time. I wanted to mask off the area where the greeting would be. I got a Post-It label and cut it in half. (You can use anything really. Junk mail or scraps from other projects are fine.) Then I put it on the card where I wanted the greeting to appear.
Next I put another old Post-It note (that I have used as a mask before) and covered the back of the card. I have all my inks and stamps ready to go here above my project.
I stamped the flowers and leaves above and below the post it label and didn't worry about overlapping it. I like to vary the size and colors that are next to each other. It keeps your eye moving and makes it more interesting.
This particular stamp set has a matching set of dies. I used them to cut out some flowers that I will adhere with pop up foam adhesive later. I stamped the matching stamps on the cut out flowers and put them to the side to dry for a minute.
So you see what happens when I peel up the label? There is a perfectly clean space ready for me to stamp the greeting in. This is so simple!
You can see here that I added the pop up flowers next.
So my greeting stands out and looks very clean and elegant. I like to add gems as well. They add another layer of sparkle and fun.
Don't forget the back and the inside. They are just as important to making the whole card look finished. I like to sign the back to show this card was made just for the recipient.
The popped up flowers add some dimension that is fun and pretty. They squish down flat inside the envelope so you shouldn't have to worry about mailing this to a friend.
Thank you so much for stopping by to take a peek at my projects. I wanted to credit Papertrey Ink for the stamp set and matching dies. Their online shop is located here: http://www.papertreyink.com/
The inks are by Memento, Colorbox and Doodlebug.
Please stop by again soon to see more sharing.


1 comment:
I saw this on "sweet living magazine" and i love it, thanks i am also your new follower.
well done!
Post a Comment